Showing posts with label tutorials. Show all posts

10.05.2020

New Video: How to Sew a 3D Face Mask with ONE Pattern Piece!

New Video: How to Sew a 3D Face Mask with ONE Pattern Piece!

Making light of a dark situation is how we try to roll around here. If you gotta make a mask, you might as well make it FUN.

After wearing this 3D face mask in a "Dollar Store Video Haul" on my YT Channel last week, I received a ton of personal requests for a tutorial on it. Apparently, like me, a lot of us are still looking for that perfect DIY. Lemme tell ya, I wish I'd known about this style when all this ish began, because as far as masks go, it is the bomb diggety. So, I whipped up a step-by-step for ya! With some...intriguing assistance from Rob.

New Video: How to Sew a 3D Face Mask with ONE Pattern Piece!

This is our favorite mask. No center seam, no darts, and easily adjustable for all schnozzes. Marie at A Stitching Odyssey hepped me to this style via her Instagram. I changed it up to include an all-in-one elastic casing and an optional nose bridge. One pattern piece, and so easy to make! I just wish I'd known about it before sewing up the other 999 masks I've made.

Watch the step-by-step (with the usual hijinks) on the channel! Just click here:

How to Sew a 3D Face Mask: With ONE Pattern Piece!

Stay safe, and keep smiling, y'all. Or smizing. See you later this week with a garment post :)

7.30.2014

tutorial: romper with room!

oonaballoona romper tutorial simple simon

The last time I wrote a tutorial, I took two rectangles of fabric and tried to make Advanced Calculus out of them...AND I AM NOT THAT MATHY.  This time, I'm going to try and explain things easily and visually, as really this romper is just a marriage of rectangle and triangle, with two baby foothole curves thrown in.  Also, Proper Use Of Capitalization For Better Ease Of Tutorial Reading!

(Disclaimer: Use at your own risk, this obviously ain't no couture technique tutorial.)

oonaballoona romper tutorial simple simon

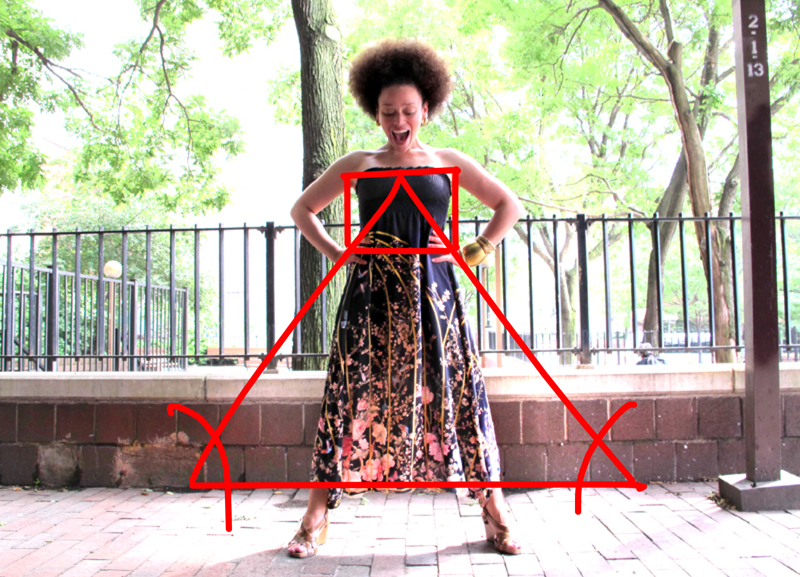
We'll talk dimensions in a minute, but I think it's easier to look at this jammy in shapes first.  The top portion is a rectangle, the bottom portion is an equilateral triangle, the footholes are small gentle curves. Erase the intersections and you have this:

oonaballoona romper tutorial simple simon

You are going to cut out two of this new shape, on the fold, one for front and one for back.  Fold is CF and CB.  (If you're playing with slippery fabric, or detailed print placement, you might want to make a whole pattern piece.) 


Ok, dimensions!  Tres important, and completely ambiguous here.  Well, not completely.  This thing can only go on by way of your hips, so let's start there...

The width of the rectangle must be as wide as your widest measurement, or you'll end up with a wadder.  Or a one legged skirt.  On me, that's my hips.  If your bust is wider than your hips, then the width must fit your bust.  Whichever measurement is larger!  The shirring will help hold it up, but you may find you need straps if you're a busty gal.

The length of the rectangle depends on where you want the waist to hit.  I wanted an empire waist feel, so my rectangle dimensions were 10 1/2" wide on the fold  (21" wide flat measurement, 40" wide tube after sewing it all up) and 7" long.  Remember to account for seam allowance, and any ease you might want!!

The length of the "skirt" portion is up to you-- but I find the longer the drop, the skirt-ier the crotch, ie less "man-junk-on-woman" effect that Ruggy so dearly abhors. If you intend on wearing the garment both as romper and skirt (by pulling the shirred section down to your waist) then the side seam should only extend to about mid calf, so that your garment doesn't drag on the ground when you wear it as a skirt.  If you're intending to wear it only as a romper, the side seam can go on down to about 4" above your ankle.

The bottom seam of the fabric should be as wide as your fabric allows, really, for maximum flowiness. Totally couture term.  My finished bottom seam is 40" wide from foothole to foothole.

oonaballoona romper tutorial simple simon


Footholes for your footsies! At the bottom corner of my triangle, I marked 4" in on the bottom seam, and 6" up on side seam, then connected those marks with a nice gentle curve.  The curve needs to morph into a straight line just at the seam allowance (there's a better way to say that, i'm sure) otherwise you'll have a weird extra piece of curvy fabric you'll have to cut off later when making the foothole hem.  Which is no biggie, again, easy-peasy-loosey-goosey-this-ain't-no-couture-tutorial.

oonaballoona romper tutorial simple simon


Time to sew it up.  On both pieces, at the top of your rectangle (the "bodice") turn under 1/4" and again 1/4" and stitch to form the neckline. You have to do this before shirring, doing it after will cause you Brain Pain.  Then shir each rectangular portion with 1/4" spacing (the tighter the spacing, the snugger the bodice).  I won't go into how to shir here, there is a landslide of tutorials out there, but I will say I don't recommend that you mess with your bobbin case tension to get your machine to shir. Some machines just don't want to shir, and I don't blame them.  I used my Featherweight.

Now sew your side seams from bottom to top (I always sew seams from wide to narrow ever since reading a Threads article by Susan "The Godmother" Khalje), in whatever fashion you choose, neatening up your seams if you're not using a serger or french seams.  Sew your bottom "hem line" seam, again, finishing the raw edges.  All that's left is to turn your "footholes" under, 1/4" and 1/4" just as you did the top neckline, stitch, and BAM.  YOU'RE DONE.  Try it on and dance around!  Do a high kick with no fear of showing the world yo lady parts!

Phew.  I hope this made some kind of sense.  The shirring takes time, but I've worn my jumper about eight bajillion times, so that's like two nanoseconds worth of shirring per wear.  Good exchange rate.


And iffin ya didn't know, this tutorial is my small, weird contribution to Simple Simon's Skirting the Issue!  Many lovely sewists have contributed tutorials, with the hope that sewists will donate skirts made from these tutes to girls living in foster care-- for example, fabulous Faye has contributed adorable items for multiple girls!  (Of course you can use any pattern you like, you don't have to use a tutorial.) You can donate skirts all the way up till August 15th, and there are prizes to be won (on top of the good feelings you'll get by simply donating a skirt). Elizabeth and liZ have a beautiful post up today about how it all started.

I think this romper would be more suited for teens, and it's the sort of thing that you can make up in a loose range of XS-XL sizes.  And hey, if you try it in a teen size to be donated first, you've had a nice practice run for a you-sized romper!  Bringing selfless back to selfish, kalkatroonaan style!

(And let's just skim over the fact that I was supposed to come up with a "skirt" tutorial.  I assume at this point Elizabeth and liZ know my brain functions on a different set of definitions.  Tee hee, and tra la.)  

ALRIGHT! I'm off! Do tell me if you try it!

6.22.2012

on friends, fraying, and finds


hello, gorgeous.  is she not a thing of beauty?

i've found that eliminating a center back seam helps very much in the fight against mount crackatoa.  but a side seam zipper means no pockets.  swallowed center back defeated!  mais non, where's a girl gonna hide her flask! enter casey's delicious slashed zipper tutorial.  zipper in the back, pockets in the sides, party all around.  

too bad the maxi skirt it lives in is a complete and absolute hot mess.  like surface of the sun hot.  i'm not abandoning it, but i AM giving it a healthy stay in solitary confinement.  the slashed zipper truly is its saving grace. i love it.  


i'm also in love with this little gadget, hollie's handy seam allowance guide.  i know you've seen this colorful beauty all over the sewing blogosphere, in fact the lovely lizz and karen have both done fantastic in-depth reviews of its major purpose: cutting out patterns that don't include seam allowances.  (i haven't tried it as such yet, as i seem to lack the will to use a burda pattern.) 

but here's where it works best for an i can totally eyeball that edge to a 5/8 seam allowance kinda gal like me.  to be honest, i am that kinda gal.  i have a ruler in my head.  the cool clear kind with the grid and everything.  but sometimes i'm tired, or boozy, or hormonal.  what have you.  that's when i throw this happy yella magnetic jammy on my ginghers and let it do the work.  

after sewing up this patternless draped skirt, i wanted to trim the allowance down to a reasonable width.  i just used my stitching line as the guide (ignore the part where i got drunk and veered off course, thankyouverymuch), matching it to the little black moveable hoop... et voila.  instant perfectly measured allowance.  no chalk lines, no held breath.  this works great for any occasion needing a trim--  you know, every time a pattern instructs you to sew facing to neckline, and trim down to 3/8s?  or attach bias tape, trim allowances to 1/4?  SHABAM.   

and if you happen to be the reckless sort of self taught draper i am, you can even use it to trim your fabric right on your dress form.  maybe you're eyeballing a high neckline and want to hack an inch off of it.  center your seam allowance guide up, and away you go.


i used it to trim my lace facing for le slashed zipper....


GUTS.  pretty pretty guts, thanks to casey and hollie.


and now i've got a tip for you!  after all, i think i owe one karmically.  maybe it's something you already know, maybe it's a tidbit that will rock your world and build my karma up to Hot Mess Maxi Skirt saving levels.

ever worked with loose knit fabrics that fray like a burlap sack?  part of this skirt's sentence to solitary had to do with the RAGE i felt sewing up seams.  never have i missed my overlocker more.  all the nice thick threads of fabric kept bunching up in front of my presser foot, they would just not lie flat.  and unpicking wonky seams did not help the fray factor.  fairly late in the game, a light bulb went off and i used a mini invisible ruler (my real one, not the one in my head) to hold the rapidly fraying edges flat, feeding them beautifully under the presser foot.  do this slowly, of course, i will not take the blame for any speedracers out there who sew through a ruler or cause a broken needle to fly into human beings and/or cats... but if you proceed with caution, this works like a charm.

happy weekend everyone!  in that area, may you proceed with WILD ABANDON!

4.30.2012

bangled beauty tutorial


i've decided to throw my hat into the MMM ring.  zo commands: no panic sewing.  i like that rule.  but really my closet is mostly made up of fancy frocks.  so, instead of finishing off a few casual items this weekend, what did i do?  i made some bangles.  and a tutorial on how to make some bangles.

bangles!! i love them so!! and i had to leave so many of them behind in new york!  most of my bracelets are of the thick and chunky tree trunk variety, not travel friendly when you're trying to stay under the weight limit and still get half your home across the country.  as i stitched up my version of an everyday dress, i pondered my choice of facing: this orange dye job from my self drafted dress.  why did i choose to put it on the inside?  what happened to my pattern matching penchant?  was there not enough whiskey in my sunday coffee?

then... eureka!  i could wear it on my wrist.

you will need:
medium to heavy weight fabric (i used quilting cotton)
medium to heavy weight interfacing (lies! i used light weight)
thread, scissors, ruler, marking pen
an irish coffee


this is a GREAT way to use up those scraps of special fabric and bits of interfacing that you can't bear to throw out.

first, decide on the circumference of your bangle-to-be.  you could tie a string in a loop and practice getting it on and off, or loosely wrap fabric round your wrist, or have a nice long swig of that coffee and then dunk your hand in the mug and measure the circumference of that.  (actually, that works.) remember, you don't want it too wide or it'll fall right off your mitts.  add 3/8s inch for your seam allowance... my circle came out to 9 inches total, but i have gorilla hands.

(i guess you could also measure an existing bracelet and add 3/8s inch, but where is the fun in that.)

you can cut it to any width you like.  for this tute, i just used my invisible ruler to measure out a perfect 9 x 2 inch rectangle.  lay your fabric wrong side UP on your ironing board.


press & fold over one long end 1/4 inch.  then eyeball fold the other long edge in and press, so that when you fold that 1/4 inch edge down, you will make...


an envelope!  give it a good press job.  this is the final width of your bracelet.


now lay that pressed strip down on your interfacing.  cut 2 strips of interfacing to match this width & length.


open up your bracelet (wrong side is still UP) and lay one piece of interfacing down the middle, "glue side" touching the wrong side of the fabric.  carefully steam press the interfacing onto the fabric, keeping it straight. don't press your 1/4 fold out, you'll need it in a minute!


now take your second piece of interfacing and place it "glue side" UP, right on top of the strip you just pressed.


fold those long edges back up to make your envelope, and give it a good steam press to seal it up.  this is the inside of your bracelet.


at this point, the envelope is not completely sealed.  the little 1/4 fold nicely hides any raw edges, but it isn't fully touched by the interfacing.  head on over to Ye Olde Sewing Machine and sew, inside up, along that folded edge to close it.  yes, that's magic tape on my 221 featherweight.  WHAT.  izzie is a bit of a punk, she can take it.

you may now have another swig of spiked coffee.  what, you drank it all already?!  GOOD GIRL.  go pour yourself some more, i'll wait.

turn that jammy right side up and go to town with some topstitching. i just went with straight lines back and forth but it's all up to you and your level of inebriation.  the topstitching will help your finished bracelet keep its shape, but if you're going with a heavy weight fabric/interfacing, you may not need it.


we'll seal the deal with a little french seam action... right sides together, sew at 1/8 inch. then clip the corners at an angle.


turn it to wrong sides together, and sew at 1/4 of an inch.  with the tip of your iron, give the seam a press to one side and topstitch it down.


DONE.  now you have a bangle that won't break the bank or the weight limit on that weekender bag, and you've used up those scraps ya love so very much!


here they are lounging by the fabric for my casual dress... you'll be seeing these lovers in action later this week as i document my me-made-may (my personal pledge coming up later today... i'm working out the kinks).

happy monday y'all!  

1.06.2012

and now for something completely normal.


(ETA 2016: Every time I trace a smaller pattern piece on my ironing board, I wince at the thought of this tutorial. Guys, don't trace your patterns by sliding them under magnets. It's a TERRIFICALLY  bad idea. I'm leaving it up here for posterity. But hopefully the red warning label will catch your eye. Read on, if you like.)

i realize that many of you come here for the sewing.  (some of you come here through do the math.  it's confusing, i know.  shhhhh.)  and yet i bombard you with exorcist christmases and sweaty ballerinas.  so i thought i'd share a little tracing tip i came up with the other day.  it involves the power of MAGNETS.  ooooooooh.

my beloved ikea ironing board is made of metal (or the ikea version of metal), and it's fairly wide.  i've traced many small pattern pieces on it using my pin catchers as weights, the magnets inside creating a slight attraction between paper and board.  my ah hah! moment came yesterday when i realized removing the middle man (plastic case) would up the force field.

if your ironing board is metal and flat (not too much padding), you're good to go.  grab an invisible ruler, tissue paper, flat magnets (you can find these in packs of 10 at any arts & crafts store), and a very fine pen that writes easily without requiring much pressure.


this method is easy when the pattern piece is small, like a facing, but i'll show you how to trace sections that won't fit on your board.  have a swig of coffee (or tea, whatever, but by all means put some bailey's in it).  repeat. now, align the pattern edge with the edge of the board.  let the excess hang off towards you.  then align a sheet of tissue paper to the edge.  all edges of pattern, tissue and board should meet.

yes, that's better homes and gardens in the background.  it was the booby prize when readymade got canceled.  i am NOT happy.


place several magnets around your sandwich, enough to keep the pieces in place.  one near the grainline is especially nice.  mais, not too close to each other as they will flock to their mates!  (yeah, DUH, but i did it twice.)  the love affair between magnet and metal board will keep your pattern nice and secure.  trace away!

(but oona, i hear you cry, what if i break through the paper to the board and mark up my cover?  okay, one: that's what washing machines are for, and two: use a light touch, meathooks.)


when you've traced all you can, move each magnet one by one to the edge of the board closest to you, making sure you're not moving your papers.  don't slide the magnets.  I SAID DON'T SLIDE THEM.  


then lean ever so gracefully over and grasp BOTH paper edges delicately, and with an even pressure pull the sandwich away from you.  hey!  you must pull both paper edges at the same time and equally!  go ahead, pull...


until you've reached the point where you can begin tracing again!  you can see my turquoise tracing lines match up perfectly.  spread your magnets out, and you're ready to start again.

so.  did you know this already?  was this completely pointless?  how do you trace your patterns?

(ps: faye, here's the double agent dress tutorial you were looking for. bonus, it involves way more alcohol!)

11.15.2011

THE DOUBLE AGENT DRESS TUTORIAL


(ETA 2015: Oh, past oona. You're so cute, with your complete disregard for Capitalization, and your completely incomprehensible tutorial. I can't even understand this! I'm leaving it up for entertainment value, but do follow this one at your own risk. Basically this dress is two long jersey rectangles with armholes. And now, back to the actual post.)

that's right, bitches.

gather:
about 3 yards of four way stretch jersey, 60 width (you can get away with 2 way if you're careful)
polyester thread
ball point needle & pins
tissue paper
ruler & measuring tape
some good tequila 

measure: (my measurements in parenthesis for example)
armhole, just loop your tape loosely from top shoulder, under arm and back to top shoulder  (16)
waist  (28)
bust at widest point  (34)
hip at widest point  (38)
dress length:  from lower point of underarm to wherever.  knee.  ankle.  thigh (slut).  (28)

calculate:
A: armhole divided by 2 = __    (8)
B: waist measurement divided by 4 = __    (7)
C: bust measurement divided by 4 = __    (8.5)
D: hip measurement divided by 4 = __    (9.5)
E: length stays the same = __    (28)

that's a lot of math for me.  at this point, i suggest you get your tequila out and have a good swig. DON'T SHOOT IT, GODSAKES THAT'S QUALITY TEQUILA.  done sipping?  let's make the pattern pieces.

using your new figures, make your top and bottom pattern pieces:

TOP: one rectangle, on the fold, measuring E by B  (28 x 7)
BOTTOM: one rectangle, on the fold, measuring E by D  (28 x 9.5)


these are SO not to scale.  i drew them about forty times and finally gave up.

now make your BUST piece:  draw a straight line equaling A (for me, 8 inches long).  this is your center fold.  now draw a line equaling D for the bottom edge, and a line for the upper edge equaling B.  at the midpoint of A, measure across equaling C.  it should look like this:


now connect those dots by drawing in a nice little curve on the open edge.  this is where your arm will go.   

you now have all three of your pattern pieces!

add your seam allowance all along the edges of all pattern pieces, except on the fold.  unless of course you're a hoochie mama and you want it tight, then forget the extra room.  you may also want to make it in hot pink spandex.  or dizzying stripes.  no judgement here.

you'll need to cut each piece out, on the fold, twice.  

sew bottom edge of BUST piece to upper edge of BOTTOM piece.  sew upper edge of BUST piece to lower edge of TOP piece.  it will look like this:


you now have one half of the dress.  do the same for the remaining pieces.  join front and back at side seams, matching bust piece seams, remembering to keep that nice little curve you created for your armhole open on the BUST piece.  duh, who would sew it all the way up without armholes.

now dance around in front of the mirror while you shimmy in and out of its myriad looks.  try it upside down to start off with.  at this point, you should have had enough tequila to come up with some interesting combos...


some other thoughts:  

don't have a serger?  you should be able to zigzag the seam with great results.  make sure your seam allowance is wide enough so that the zig zag is at least 1/4 of an inch away from the seam edge.  this will help keep it from bubbling.  don't have a zig zag setting? stretch your jersey at both ends while sewing with a looooong stitch.  but really, straight stitch sally, get a zig zag.

if you cut carefully, you can leave your edges raw, as stretch jersey doesn't fray-- just look at anything made by american apparel.    

always use the right machine needle!  ball point, jersey, or, in trampy spandex land, stretch.  and 100% poly thread is your friend.  your very good curve loving friend.

my biggest difference in measurement is ten inches.  i have no idea if this will work with a wider differential. again, get your tequila out, and try it.  the worst that could happen is you'll end up with a cool cowl scarf and a nice buzz.

lemme know if you do it, and above all, please tell me what you chose to imbibe whilst doing.  priorities.

(ps: feeling too lazy to sew?  slacker.  enter my shabby apple giveaway to win a candy cane dress! now closed)

10.26.2011

mwah


please excuse the laundry in the background.  for ruggy's birthday week, i did his laundry.  he had five loads.

stacie over at the beautiful blog stars for streetlights contacted me a few weeks ago with a little challenge: make something wearable out of a scarf from her shiny new workplace, affordable scarves.  i love scarves, i have a collection of about thirty, so i happily welcomed a new addition.  out of all the silk and cotton offerings to be had, i picked this poly blend.  it could not be helped. it measures 74 x 40.  basically it's yardage with finished seams.  but my brain was locked into the fact that IT'S A SCARF.  refashion blockage ensued.  i stared at it on a hanger for a week before pummeling my brain into submission.  BRAIN, i said.  REMEMBER THIS SHIRT? THIS WOULD BE THE PERFECT TIME TO DO THAT TUTORIAL.
(oona, said brain, i'll get up off my ass for that.  god knows you promise tutorials and never let me seal the deal.  let's not even TALK about pay it forward.  have you instructed hands to pack those boxes up yet?)

whatever, brain.


take your scarf and fold it in half lengthwise, finding the mid point.  slice it right down the middle, finish your new raw edges, and sew it together again about 2/3 of the way up.  this is now your center back seam.  i sewed it up to where the black border hits.  YOU ARE NOW DONE SEWING.

see those flaps hanging down in the second picture?  they basically become your back facing!  flip that jammy to your backside, center seam at center back, the open part of the seam facing up.  grasp the upper ends of your scarf.... 


and pull them towards center front.  wrap the ends around the back of your neck and tie-- i like to use a pretty pin from my vintage collection instead of a knot, but either way works.

then grab the scarf at waist, or just below bust, or wherever floats your boat, cinch it together, and stitch through all layers a couple times.  if you make it loose enough, you can untie the neck and easily slip this over your head, as the back sits low.  

(yeah, i know i said you're done sewing.  i lied a little bit.  you can use another pretty pin here and make me an honest woman.  a button loop closure would also be grand.  doesn't help the lying, but earns you extra fanciness points.)


the amount of back displayed depends on how high (or low) you sew up the center back seam.   


i kind of feel like that chick on project runway that's been sewing for four months and always floats around in gauzy me made things.  it's a great easy cover up for the summer, non?  you can go from picnic at the beach to lobster dinner by the water!  

hmm.  now that i'm writing this up, i'm thinking i may get brain to come up with a nice button loop closure for the front.  but brain is notoriously lazy.  we'll see.